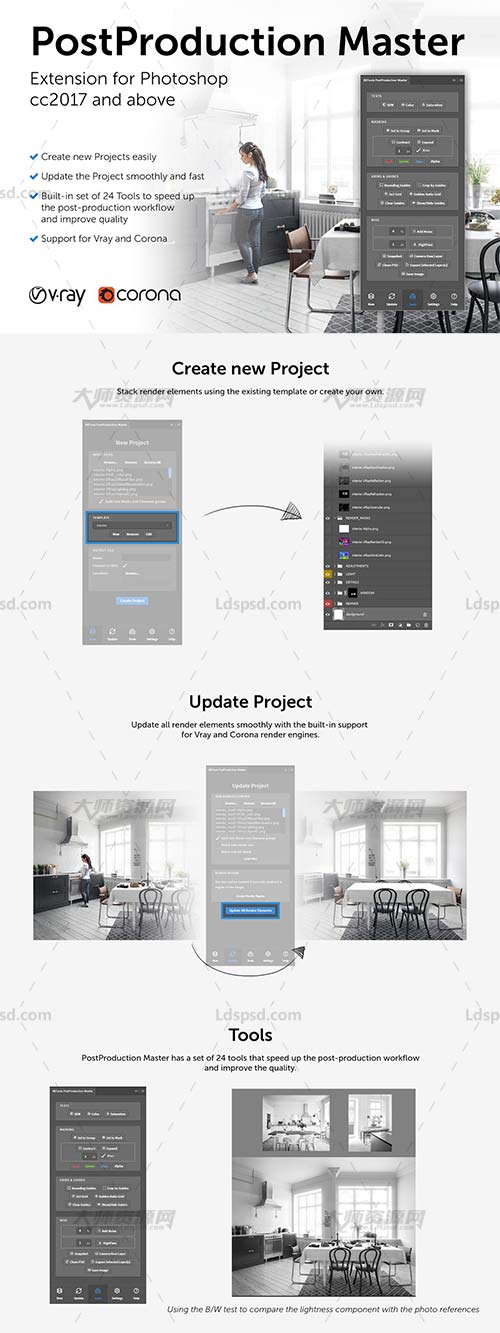
极品PS扩展面板-后期制作大师(含高清视频教程):PostProduction Master
|
极品PS扩展面板-后期制作大师(含高清视频教程):PostProduction Master
ZXP,PDF,MP4 | 62.77 Mb
DETAILS
PostProduction Master is the essential Arch Viz post-production extension for Photoshop.
Key Features:
Create new Project easily (using existing template or create your own)
Update the Project smoothly and fast
Built-in set of 24 Tools to speed up the post-production workflow and improve quality
Support for Vray and Corona
Panel UI Controls:
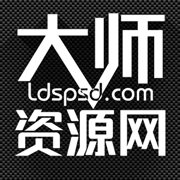
New tab:
Stack the render elements into a Photoshop using the "Browse" button.
Split render elements into two groups: Masks and Channels. Based on their use render elements can be split into two groups to give a better overview of the project. This option supports both Vray and Corona.
Template section gives the good starting point when creating a new project. You can choose from existing templates or create your own.
Define a template name.
Convert the image into 8bit or leave as it was rendered.
Choose a location where to save the project (it will be automatically saved as .psb file to give more room to play with).
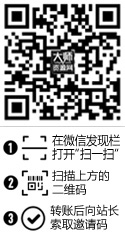
Update tab:
Stack new render elements into a Photoshop using the "Browse" button.
Split render elements into two groups: Masks and Channels. Based on their use render elements can be split into two groups to give a better overview of the project. This option supports both Vray and Corona.
Match new render size (width x height in pixels).
Match new bit depth (converts the image bit depth to a new bit depth).
"Update All Render Elements" automatically replaces all render elements in a single click. This option supports both Vray and Corona.
Create a render region if you only rendered the region of the image.
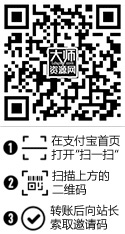
Tools tab:
B/W test checks only the lightness component of the color. Works as a toggle.
Color test checks only the hue component of the color. Works as a toggle.
Saturation test checks only the saturation component of the color. Works as a toggle.
Sel to Group (Creates a layer group that has the layer mask from the active selection and we are prompted to write a group name.)
Sel to Mask (Creates a layer mask from the active selection or if layer mask is present it replaces it with the active selection.)
Contract (Contract the layer mask by a specified amount in pixels (1-100px) and blurs it if specified.)
Expand (Expands the layer mask by a specified amount in pixels (1-100px) and blurs it if specified.)
Red (Selects only the red channel from the “MultiMatte” render element.)
Green (Selects only the green channel from the “MultiMatte” render element.)
Blue (Selects only the blue channel from the “MultiMatte” render element.)
Alpha (Selects only the whites from the Alpha render element, only if it is saved as a file that doesn’t support transparency by default for example .tif file.)
Bounding Guides (Creates bounding guides around the image or if the selection is present it creates the bounding guides around that selection.) Crop by Guides (Crops the image based on the four bounding guides that represent the rectangle for the cropping. It is important to have only and exactly four guides for the tool to work.) 3x3 grid (Or the rule of thirds as used in Photography, creates the 3x3 grid from guides.) Golden Ratio Grid (Or sometimes called a Phi grid is also used in Photography and it creates the 3x3 grid from guides in a golden proportion.)
Clear Guides (Deletes all guides.)
Show/Hide Guides (Works as a toggle and it hides or shows the guides.)
Add Noise (Adds the noise layer that has the blending mode set to “Overlay” and it is useful for adding a subtle texture if the material looks too plastic or it can help solve the color banding issue.)
HighPass (Adds the layer that has the blending mode set to Overlay and uses the HighPass fitler. It can be used to increase the sharpness of the selected layer.)
Snapshot (Merges all visible layers into a single layer and adds it to the top of the layer stack.)
Camera Raw Layer (Works similar as the Snapshot tool but with a difference that it creates the smart object layer and names it “CAMERA_RAW”.)
Clean PSD (Makes the Photoshop file a lot cleaner. It deletes all empty layers, capitalizes layer group names, deletes color test layers and adds numbers to the duplicates of the group names. Clean PSD can be adjusted to our preference inside the Settings tab.)
Export Selected Layer(s) (Exports the selected layer(s) as separate files.)
Save Image (Saves the image to the specified file format.)
Settings tab: Configures:
Clean PSD Tool
Export Selected Layer(s) Tool
Help tab: Has all the links for the user guide (.pdf file format) and the video tutorial links (youtube).
System Requirements:
Photoshop CC 2017 or above
Windows or Mac
What's Included:
The extension (.zxp file format)
Installation guide (.pdf file format)
User guide (.pdf file format, 18 pages)
In-depth video tutorials (Youtube)


资源下载说明
1、免费资源-注册本站会员后即可直接进行百度云下载;VIP资源-需要会员消费相应金币后方可下载。
2、下载的资源如果碰到需要解压密码的,请输入:http://www.ldspsd.com
3、请用winrar 5.01及以上版本解压本站的资源。否则低版本的及其它解压缩软件可能会解压出错。
拓展名说明
1、PSD=Photoshop,EPS=CorelDRAW&Illustrator,AI=Illustrator,CDR=CorelDRAW,PPT=PowerPoint,这些是通过相对应的软件打开后可进行再次编辑。
2、ABR=画笔、PAT=图案、TPL=工具、ATN=动作、GRD=渐变、ASL=样式,以上都是Photoshop软件的预设文件,需要复制粘贴到软件预设文件夹下相对应的文件夹里,
FONT=字体(复制粘贴到C:\Windows\Fonts文件夹里)、JPEG=高清图片。
关注大师资源网微信公众号,随时随地了解网站的更新动态。
1、通过扫描网页右侧窗口底部微信订阅号二维码进行关注。
2、通过微信公众号添加查找公众号,搜索“大师资源网”进行关注。
3、通过微信通讯录添加朋友搜索大师资源网的微信号“DS-PSD”进行关注。
4、关注大师资源网公众号后,可发送“邀请码”三个字,查看近期发布的免费邀请码信息。
1、Donate $200 through the PayPal platform, will give away a lifetime membership account. After donating, please send a screenshot to the email address of the webmaster (251633007@qq.com or lgq820304@yahoo.com), and the webmaster will reply after confirmation.
2、Lifetime VIP members can directly view the download addresses and hidden articles of all VIP resources on this site without gold coins!


您还可以输入 2000 个字符